Saturday, July 20, 2013

Export spreadsheet data using spreadsheet object from a query object in ColdFusion

In one of my previous post for exporting data from cfgrid I had used table formatting method for a spreadsheet file you can see here.
Export cfgrid Data or Table Data in Excel, Pdf and CSV Format(ColdFusion - 9)

But, I found another efficient way to export a query object to excelsheet rather than using that table formatting.

Here, in the above code first I am creating a spread sheet object in ColdFusion then I am adding the required header names for each column then I am adding data into the spreadsheet object using the query object.

What are the Benefits of using this method rather than using table formatting like in my previous posts.
  1. In first case we were looping over the query object and creating each row. So, if our query object will contain more records then we will end with looping over the query object. Which is not present here. Here we are creating spreadsheet object from the query object directly.
  2. If we will edit the spreadsheet file downloaded in NotePad++( http://notepad-plus-plus.org/ ) then we will find the <table> and <tr> tags but practically a spreadsheet file doesn't contain such data. So, the formatting is wrong. When we will export spreadsheet file using spreadsheet object then we can see the correct format.
  3. Another benefit is we can create multiple sheets within a single excel file for different query objects.

Basic Authentication in ColdFusion CFHTTP / http Call

In our normal coding we must have faced some situation where we makes HTTP call to any third party server. Sometimes these third party server doesn't enforce any authentication and sometimes we have to go to different authentication process like Basic Authentication, NTLM authentication, Integrated Windows and Kerebos Authentication.

   We generally use CFHTTP tag to make HTTP call from ColdFusion and this tag only supports Basic authentication.

So, lets see how we can do basic authentication using ColdFusion CHTTP tag.

We can perform basic authentication two ways:

1. Pass User Name/Auth ID and Password/Auth Token  in the User Name and Password attributes present in CFHTTP tag. like below:

So, in the above example I am making a call to a SMS gateway by HTTP call to get sent/received SMS by server. Here I am passing user name and password. Sometimes some third party says we are giving you AUTH_ID and AUTH_TOKEN. These AUTH_ID and AUTH_TOKEN is similar to User Name and Password. So, don't be confused with that.

2. Another way, in first method we pass User Name and Password and ColdFusion internally converts it into following format.

Basic ToBase64("User Name/Auth ID: Password/Auth Token")

So, if we could pass this format directly into the server then also it will work like the below example:

Here we are converting that Auth_ID/User Name and Auth_Token/Password  into the format which ColdFusion internally does while making HTTP call and we are passing it in a header param "Authorization". So, this second method will give the same result.

Hope it will help you :)

Monday, July 08, 2013

Bug Tracking System(BTS) Integration with SVN

Before we start how can we integrate Bug tracking System with our SVN repository I just want to clarify few points.

  • What is SVN?
Ans -  Widely accepted  source code management tool.
  • What is a Bug Tracking System?
Ans - A bug tracking system is a software which tracks tasks/issues/bugs which needs to be done/fixed for a application. Example: JIRA is a commonly used bug tracking system.
  • What is the need of integrating a BTS into SVN?
Ans - SVN tracks the code modification by different user for an application. During code commit into the SVN repository we add some description about the changes but sometimes we  need some more information about the changes like who has assigned this changes to Application engineers.
So, to find out full description we integrate BTS with SVN code commit and it will keep BTS task/bug ID with your code commit for future reference.


Lets go to next step:

System Requirements:
  • Tortoise SVN client.
  • SVN repository credential to set up your project or already setup project in some SVN repository.

Steps to integrate BTS in your SVN Project:

BTS will be integrated in your local copy. You don’t have to anything any changes in your SVN repository. When you will add a BUG id, it would be saved in your SVN commit statement.

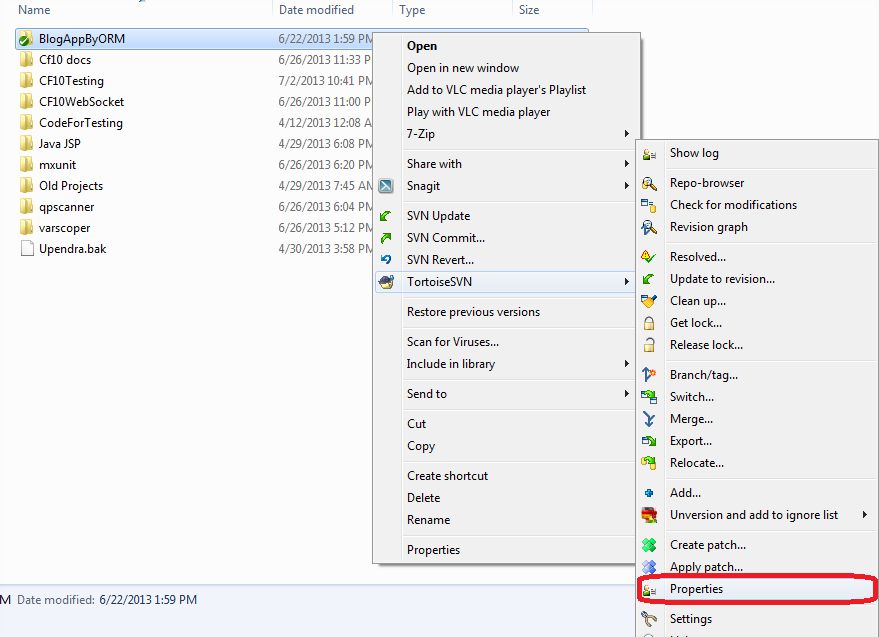
You can right click on the project folder which already committed into SVN and you can see the following option(as shown below):


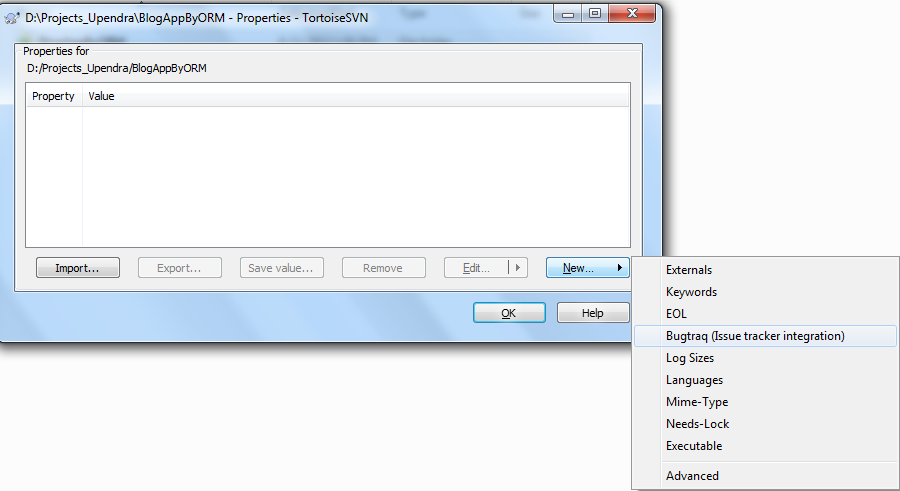
Click on Properties then you will see another screen below:


Now, click on “New” then “Bugtraq” then you will see another screen as below:


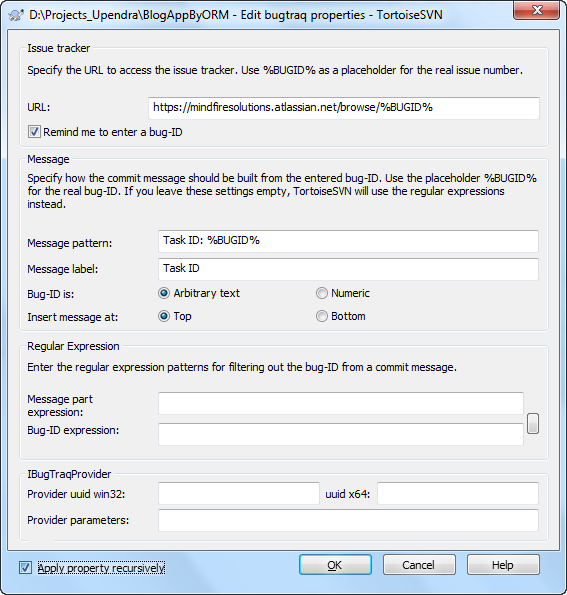
This is the main screen for setting the BTS. Lets review different input fields which we needs to filled up.

1. URL: This is your BTS url where you are tracking the bug. Example: In my case the my url is: https://mindfirsolutions.atlassian.net/browse/%BUGID%

Here, %BUGID% defines the bug ID. So, my sample BUG URL is :

2. Remind me to Enter a bug-ID: This check box defines during your code commit it will remind you to insert Bug ID if you have not entered any bug ID.

3. Message Pattern: This field specifies how you want to show your bug ID in SVN log. You must have to specify the “%BUGID%” in that pattern. I want to see my Bug ID as :
Task ID: YMLS-645 in the commit statement.
If this property is set, then TortoiseSVN will provide an input field to insert bug ID. It's used to add a line at the end of the log message.

4. Message Label: This text is shown by TortoiseSVN on the commit dialog to label the edit box where you enter the issue number. If it's not set, Bug-ID / Issue-Nr: will be displayed. Keep in mind though that the window will not be resized to fit this label, so keep the size of the label below 20-25 characters.

I have set it as Task ID to show in my commit window as well as in the SVN logscreen.

5. Bug-ID is: Select whether your BUG/Task ID is an arbitrary text or some number value.

6. Insert Message At: This property defines if the bug-ID is appended to the end of the log message or inserted at the start of the log message

Next field sets are present under “Regular Expression” label. If we will setup regular expression then TortoiseSVN doesn't show a separate input field for Bug ID input but marks the part of the log message the user enters during code commit which is recognized by the issue tracker. This is done while the user writes the log message during code commit. So, this is not required for us.

Next field sets are “IBugTraqProvider”. These fields are required to get bug information from the BTS application. We don’t require these fields.

After all setup check “Apply property recursively” checkbox. So that it will be applied all the sub folders of your project. Then click on OK.

After that make some changes and try to commit your code and you will see a screen like below.


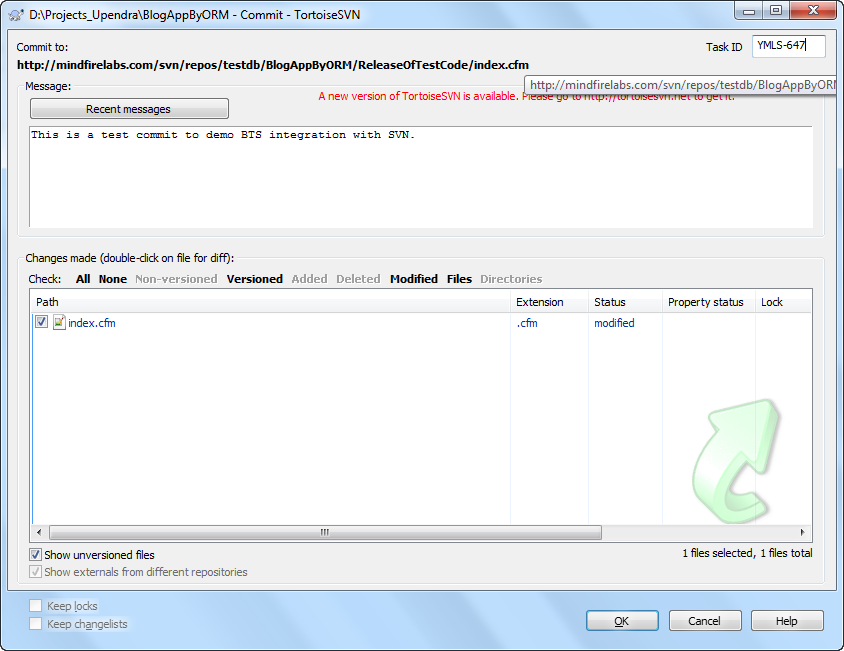
Here, you can see a “Task ID” input field at the right upper corner where I have entered my Bug ID. Also, I have entered my log message for the code which I am going to commit.

Now, lets see the svn log.


You can see a new field called “Task ID” in the log message which stores the Bug/Task ID. If you look into the log message you can see some text “Task ID: YMLS-647” is added automatically and this YMLS-647 is exactly a link to that particular Bug details. If you click on that it will take you to that particular Task/Bug.

Hope this article will help you to integrate BTS in your SVN. For more details please go to the following reference:


Wednesday, July 03, 2013

The processing instruction target matching "[xX][mM][lL]" is not allowed.

I was doing some operation on some XML document and I got a strange error :
"The processing instruction target matching "[xX][mM][lL]" is not allowed. "
I just regenerated the error with the following code sample.


Then I searched in web I found that this is not related to any specific language, this is related to the XML declaration format.

According to the XML spec we can't have anything at all before the XML prolog. In our XML we are staring with XML declaration. So, that XML declaration should be the first character in our XML document no white space or any special characters are allowed before our XML document declaration.

So, the question is how we can avoid this in our above code?

- Use trim before parsing the XML string like below
   <cfset mydoc = XmlParse(trim(request.x))>

So, trim function will remove any extra spaces present in the document before starting the XML declaration.

- Write XML declaration as the first character of your XML text. No white space or any other characters at the starting position.

- Remove your XML declaration from the XML text.


Hope it will save your time...

Tuesday, July 02, 2013

Restart your Application without restarting your ColdFusion Server

I was working in a old application where the object instantiate was done in onApplicationStart method of Application.cfc. To solve few hot fixes I modified the cfc and pushed into live but the code which I had modified was not working. As I have to reset that application variables which holds the Old component object.

So, I thought use ApplicationStop function which was introduced in ColdFusion-9. Before that I have never used ApplicationStop in any of my previous applications. I had read the documentation that this function basically used in ColdFusion ORM to reload the ORM objects. So, I just did some testing how exactly this function behaves in normal condition.

So, here is my Application.cfc for testing.

Here is index.cfm

If you will notice here in this Application.cfc I just doing file append operation in onApplicationStart(), onSessionStart(), onSessionEnd(), onApplicationEnd() and also inside onRequestEnd() when we want to refresh our application.

When the very first time I run the application I got the following output in file write:
Application started on :- {ts '2013-07-02 18:28:04'}
Session started on :- {ts '2013-07-02 18:28:04'}

And for index.cfm I got the following output:
Testing Application Stop 
10
20

Next time I just passed a URL parameter "appReset" so that I can reset the application. Then I got the following output in file write:
Application stop is going to execute on :- {ts '2013-07-02 18:28:49'}
Application ended on :- {ts '2013-07-02 18:28:49'}

And in index.cfm I got the following output:
Testing Application Stop 
10
20

So, here we observed that ApplicationStop() executed and then onApplicationStop() executed but onSessionEnd() was not executed.


On third time I just removed the URL parameter for Application reset. Then I got the following output:

In log file:
Application started on :- {ts '2013-07-02 18:29:04'}

And in index.cfm:
Testing Application Stop 
10
Error Message:
Element MYVAR is undefined in APPLICATION.

So, when we are calling ApplicationStop it doesn't affect any session scope variables. Session scope variables remain unchanged and also it doesn't creates a new session. It simply uses the old session scope but reset all application scope variables.

So, if we want to put any object instantiation code in onApplicationStart() then we can reinstantiate that using   ApplicationStop().


If someone will ask that why can't we follow simply by calling onApplicationStart() in onRequest() as per our requirements.
Yes, we can do that but it depends on your logic you have implemented in your Application.

If someone doesn't wants to reset  all application scope variable then directly call onApplicationStart(). But, if someone wants to reset all application scope variables or using ORM in the Application then ApplicationStop() will work.

Still exploring more on this...

Followers