Showing posts with label ColdFusion Splendor. Show all posts

Friday, March 21, 2014

Adding a CF Server into your CF Builder

I know this is a very old topic to write but many times I gets questions from our junior engineers regarding this and they makes some common mistakes while doing this. So, I'm going to share this:

Here, I am using ColdFusion Splendor Beta as my CF Server and ColdFusion Thunder Beta as the Builder.

Steps:
Open your CF builder and see the add server button present at the bottom panel of your builder as shown below. Sometimes this panel minimized with side bar please check it out.


Click on that Add Server button then it will open a new window like below:


Here in this window there are so many options but we will only consider options which are required for setting a local server.

Server Name: Any name to identify your server.
Description: Description for your server.
Application Server: Inbuilt server on which ColdFusion runs, form CF10 ColdFusion is integrated with Tomcat. So, for ColdFusion Splendor it's also Tomcat.
Host Name: Here you can provide any IP address or the host name.
Web Server Port: Port on which ColdFusion server is installed, best way to find is the port no used while accessing CF Admin Web Application in URL.

JEE Settings are not required for us.

In Other settings provide RDS user name and RDS password which you have set during ColdFusion server installation. Then Click on NEXT, you will see a new window like below:


Server Home: Browse and give your CF installation path and it will automatically take Document Root, select your ColdFusion server version then check the check box for "Use Windows Service to start/stop the server".

Click on Next, you will see a new window like below:


You don't need to change anything in this screen and click on finish and this window will be closed and you can see the server information which will be added in the bottom panel of the CF builder as shown in below image.
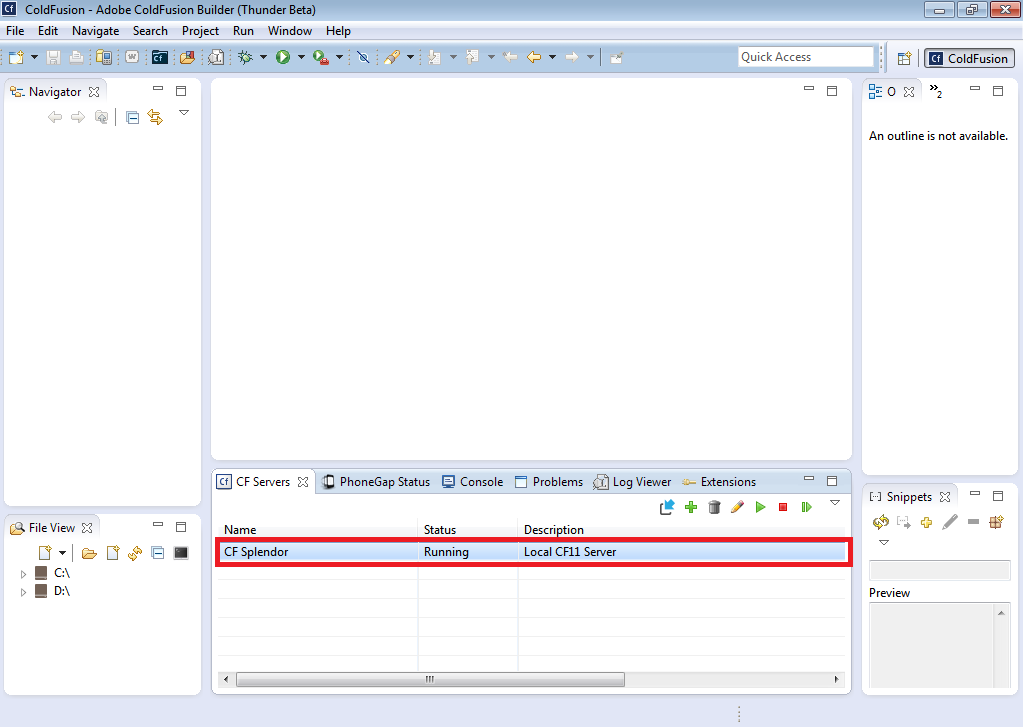


Here you can see the application server added into CF Builder and the status is Running. So, from here we can manage our CF server like: starting server, stopping server, search for data source present in that server and view tables in that data source..and many other things.

Hope it will save your time.

Wednesday, March 19, 2014

Installation of ColdFusion Builder (CF THUNDER Beta)

Installation of ColdFusion Builder (CF THUNDER): 

To download ColdFusion Thunder go to the URL "http://labs.adobe.com/technologies/coldfusion/" and login with your Adobe ID. Here are the following steps which clearly explains the installation procedure of CF Thunder

Step 1: Double click on the downloaded file, immediately a dialog box appears starting the installation process


 Step 2: Click on “Next”         
             

 Step 3: Accept the license agreement and click on “Next”


 Step 4: If you want to get the ColdFusion builder plugins within eclipse go for the second option, option 1 selects standard ColdFusion builder and click on “Next”


 Step 5: A dialog box with default path set is shown .If you want you can set the path by selecting choose button and then click “Next”


 Step 6: We can also install ColdFusion server along with thunder. As we have already have installed ColdFusion Splendor first so we will uncheck that. And select the second option to associate .cfm and .cfc files with CF Builder . If you select ColdFusion installation, here you have to set the ColdFusion Administrator password and RDS password. Otherwise ignore it.          


 Step 7: Once review the information and click install


  Step 8: It shows a pop up like this


 Step 9: If you see this screen, your installation process is successful


Step 10: After installation, if you receive any windows firewall messages click allow access


  Step 11: Here you have to select the default work space and then click "Ok".


Step 12: ColdFusion builder is opened


ColdFusion Splendor Beta Installation Procedure

ColdFusion Splendor Beta Installation Procedure :

  •  Open a Web browser and go to http://labs.adobe.com/technologies/coldfusion/ and login using your Adobe ID.
  •  Download ColdFusion Project Splendor and ColdFusion Builder Project Thunder.
  •  Save the file to your desktop.
  •  Once downloaded ColdFusion Splendor and ColdFusion Builder Thunder, Double Click on ColdFusion Splendor.
  • Click "Next".

  •  Accept the terms and conditions and click "Next".


In the Process of Installing the ColdFusion Splendor if it asks for Microsoft Visual C++ 2012 to install. Click "Ok" and repeat the Following Procedure.


  •  When you see the screen below, select "Developer Edition" and click "Next".

  •  Select Server configuration and click "Next".

  •  Leave the "Enable Secure Profile" check box unchecked and click "Next". As it is a development and we don't want to enable secure profile so we left it unchecked but for production server you must check it.

  •  Leave all check boxes checked and click "Next". These are the services provided by ColdFusion and if in production you don't need any of the services like ".NET Integration" or "Solr Service" then you can uncheck it but in developer edition you should check all as you may need any of them in future. 


  •  Leave the location at C:\ColdFusionSplendor\ and click "Next". If you want to install in a different location you can, but it is important to note that the install instructions will always reference C:\ColdFusionSplendor.

  •  Select 'Enable the Built-in web server (coexist)' and click "Next".


Now the Adobe ColdFusion Splendor Beta built in web server will be configured to use port 8501. Port 8500 is already in use (ColdFusion 10)
  •  Click "Next"


  •  Provide a password and click "Next". Make sure you remember the password; you will need this later on in the install process.


  •  Select 'Enable RDS', provide a password and click "Next". Make sure you remember the password!! In production make sure you disable RDS.


  •  Leave the 'Automatically check for server updates' selected and click "Next".


  •  Click "Install".


  •  If you receive any Windows firewall messages, click 'Allow access'.


  •  When the installation wizard is done, keep the 'Launch the Configuration Wizard in the default browser' selected and click "Done".


  •  A browser window will open. Enter your ColdFusion Administrator Password and click "Login". (This is the password which we had set for CF Admin)


  •  Click "Next"


  • Here it's asking to migrate settings of CF Admin of other CF server present in the machine. Ex: If in your machine you have CF10 and you want to migrate data source, schedule tasks and other server related settings to migrate to CF Splendor then click next. If you don't want to migrate any settings then click "skip".


  • Click "Next"


  • Click "Next" 


  • Once you receive the 'Setup Complete' screen, click the "OK" button.


  • You will now see the ColdFusion Administrator screen.


To access this screen at a later date, you can go to: http://localhost:8501/CFIDE/administrator/index.cfm 

You have now successfully installed ColdFusion Splendor. To access the web root, you can go to: http://localhost:8501/. The web root on the file system is C:\ColdFusionSplendor\cfusion\wwwroot\.

Followers